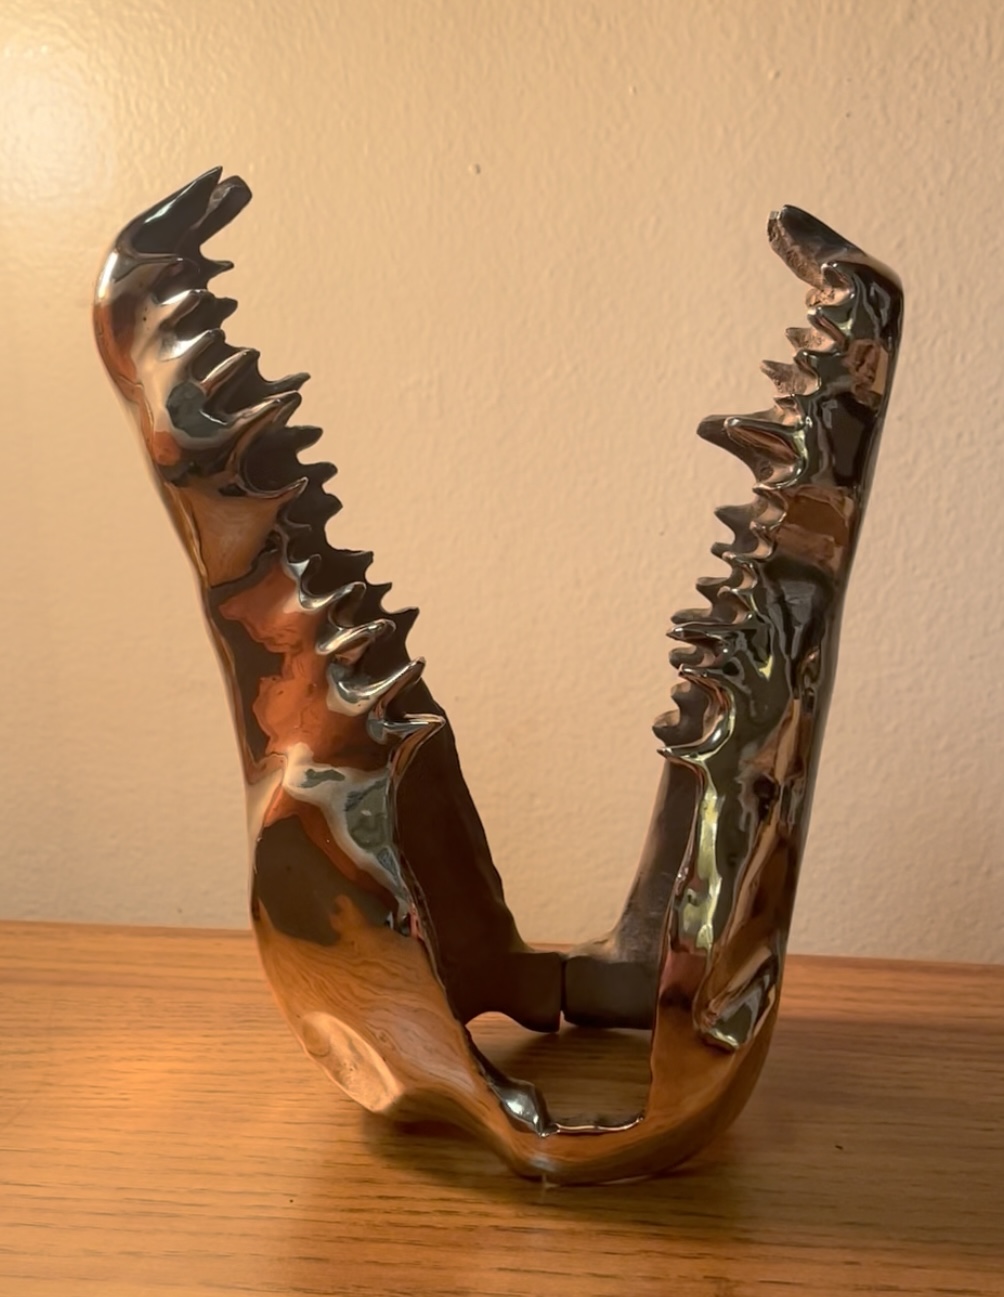
SNAGGLETOOTH
A crocodile skull planter that blurs the lines between everyday objects and artwork. Experience in Pattern Making, Sand Casting, Finishing, Brazing, Milling, and Turning. March 2024.

Scoping
Arguably, the most important part of this process was choosing a project which could be completed with all design constraints considered. With a timeline of 6 weeks from start to finish, a maximum budget of $100, and the inclusion of 2+ manufacturing processes, I ideated dozens of projects before choosing to move forward with my crocodile head planter.
Like any good design process, while my original intention remained the same throughout, there were several interations of the planter while I learned more about the materials and processes involved. Pictured are early sketches, prototypes, CAD drawings, and more detailing the process which you can watch evolve over the course of the next 6 weeks.


Patternmaking
Creating patterns that would pull from the sand was definitely the most complex and time consuming step. I wanted my crocodile head to be abstracted enough away from the anatomical skull to be its own entity, without being completely unrecognizable from it’s real life counterpart. I also needed to add 5 degree draft angles to every surface, which I wanted to accomplish in a more technical manner than just sculpting from scratch and hoping for the best.
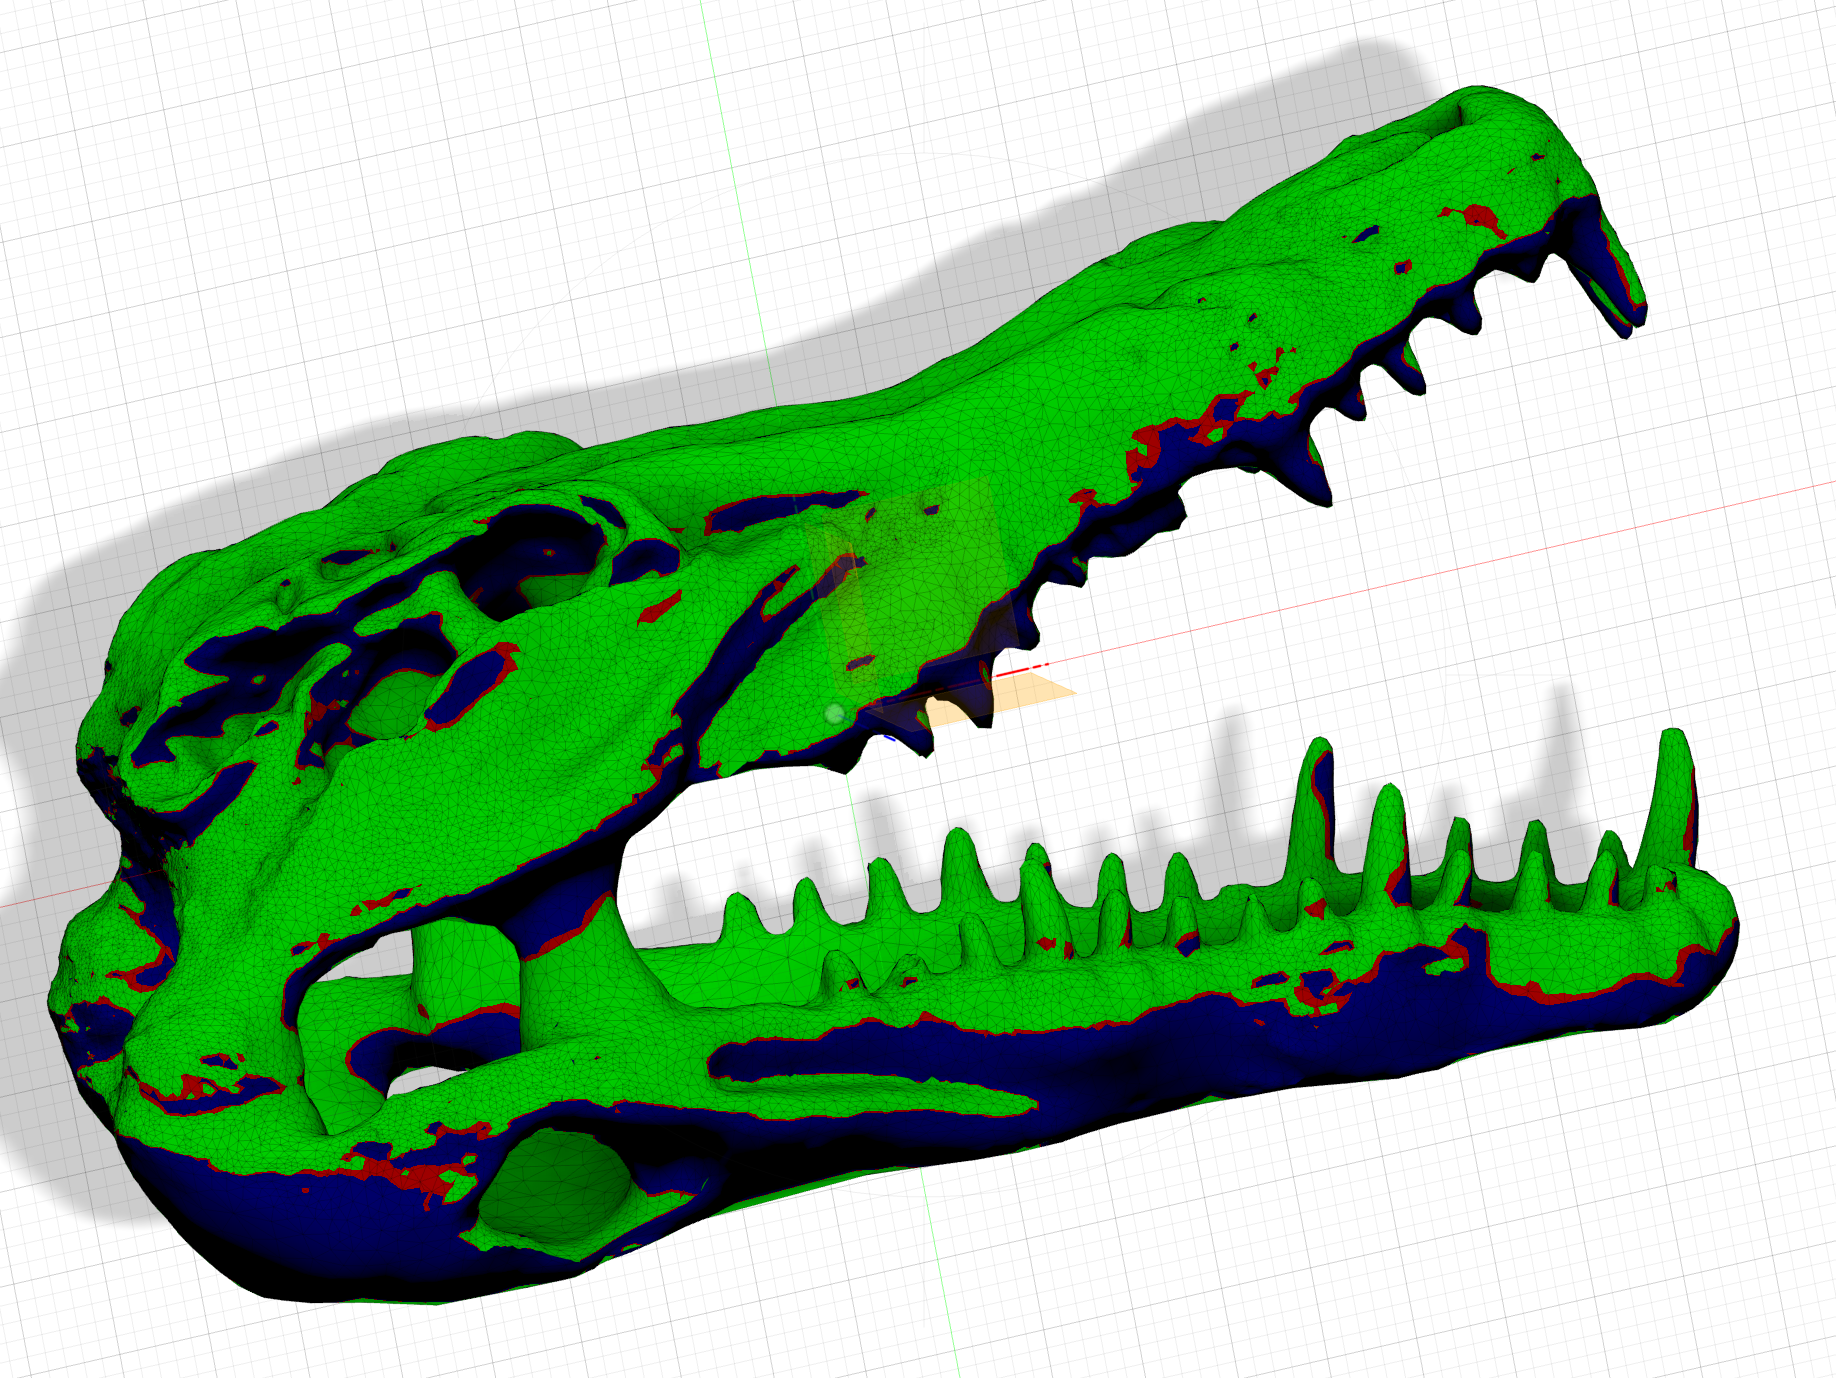
To accomplish this, I first used 3D imaging software to create an .stl file of a real crocodile skull which I could easily upload into Fusion 360. Using the draft analysis feature, I could tell exactly what areas were already drafted (green) needed draft (red) and were complete undercuts (blue). Rather than editing the mesh file, I used this analysis to inform my handiwork. I would 3D print my pattern at 100% infill, carve out where I wanted to remove material, and sculpt on additional material where I wanted to add. I would then rescan my pattern, repeat the draft analysis, redraft, and reprint until I had a completely drafted pattern for the upper and lower jaw. Finally, I casted a follow block using thermoplastics to keep everything in place.
Creating patterns that would pull from the sand was definitely the most complex and time consuming step. I wanted my crocodile head to be abstracted enough away from the anatomical skull to be its own entity, without being completely unrecognizable from it’s real life counterpart. I also needed to add 5 degree draft angles to every surface, which I wanted to accomplish in a more technical manner than just sculpting from scratch and hoping for the best.
To accomplish this, I first used 3D imaging software to create an .stl file of a real crocodile skull which I could easily upload into Fusion 360. Using the draft analysis feature, I could tell exactly what areas were already drafted (green) needed draft (red) and were complete undercuts (blue). Rather than editing the mesh file, I used this analysis to inform my handiwork. I would 3D print my pattern at 100% infill, carve out where I wanted to remove material, and sculpt on additional material where I wanted to add. I would then rescan my pattern, repeat the draft analysis, redraft, and reprint until I had a completely drafted pattern for the upper and lower jaw. Finally, I casted a follow block using thermoplastics to keep everything in place.
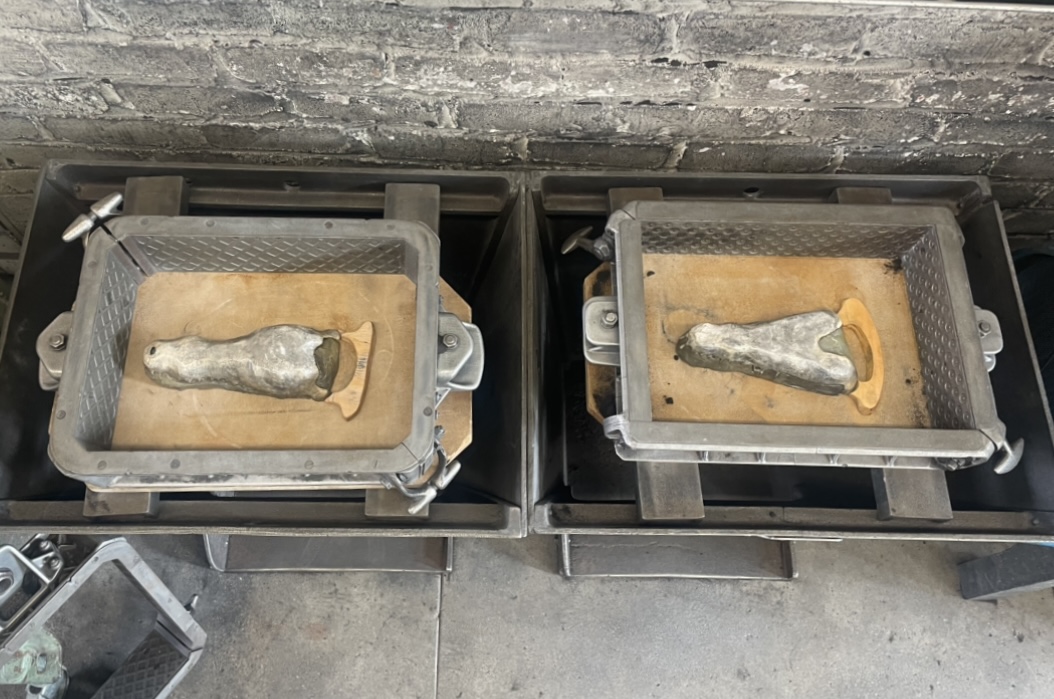
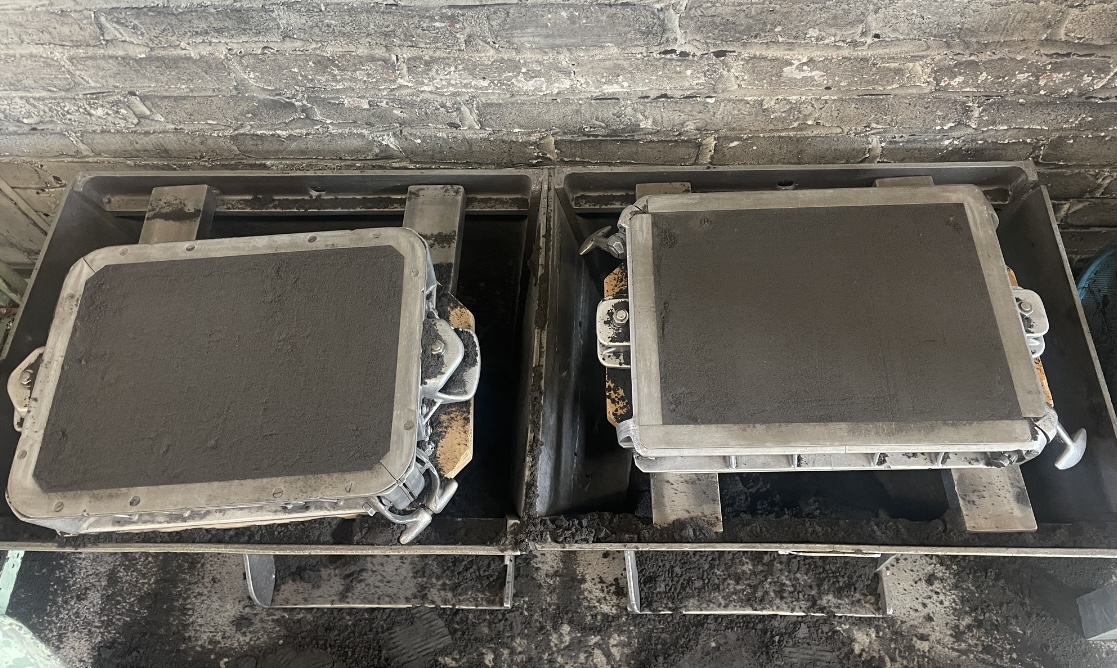
Casting
After finalizing my pattern along with a gate and runner for the molten bronze to flow through, I covered all my parts in graphite and compiled into the cope to ram up first. First, we sifted and mulled sand to the correct moisture level (not too wet it’s runny, not so dry it falls apart). I then used various techniques to mold the sand in around my pattern before flipping over and removing the follow block. Next, I rammed up the drag, repeating the process to fill in the concave underside of the top and bottom half of the jaw. Lastly, I removed the pattern, added in a sprue and bowl, and all that was left was to add molten bronze.
After finalizing my pattern along with a gate and runner for the molten bronze to flow through, I covered all my parts in graphite and compiled into the cope to ram up first. First, we sifted and mulled sand to the correct moisture level (not too wet it’s runny, not so dry it falls apart). I then used various techniques to mold the sand in around my pattern before flipping over and removing the follow block. Next, I rammed up the drag, repeating the process to fill in the concave underside of the top and bottom half of the jaw. Lastly, I removed the pattern, added in a sprue and bowl, and all that was left was to add molten bronze.
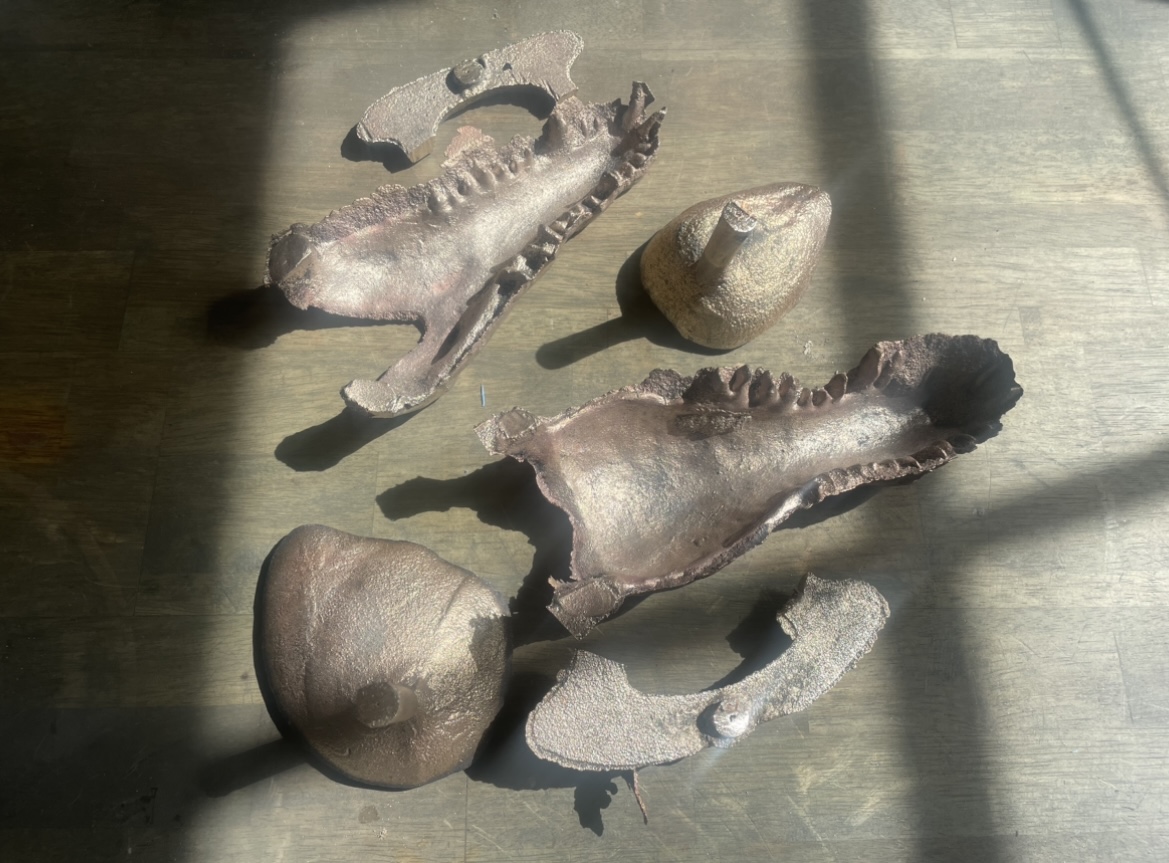

Finishing
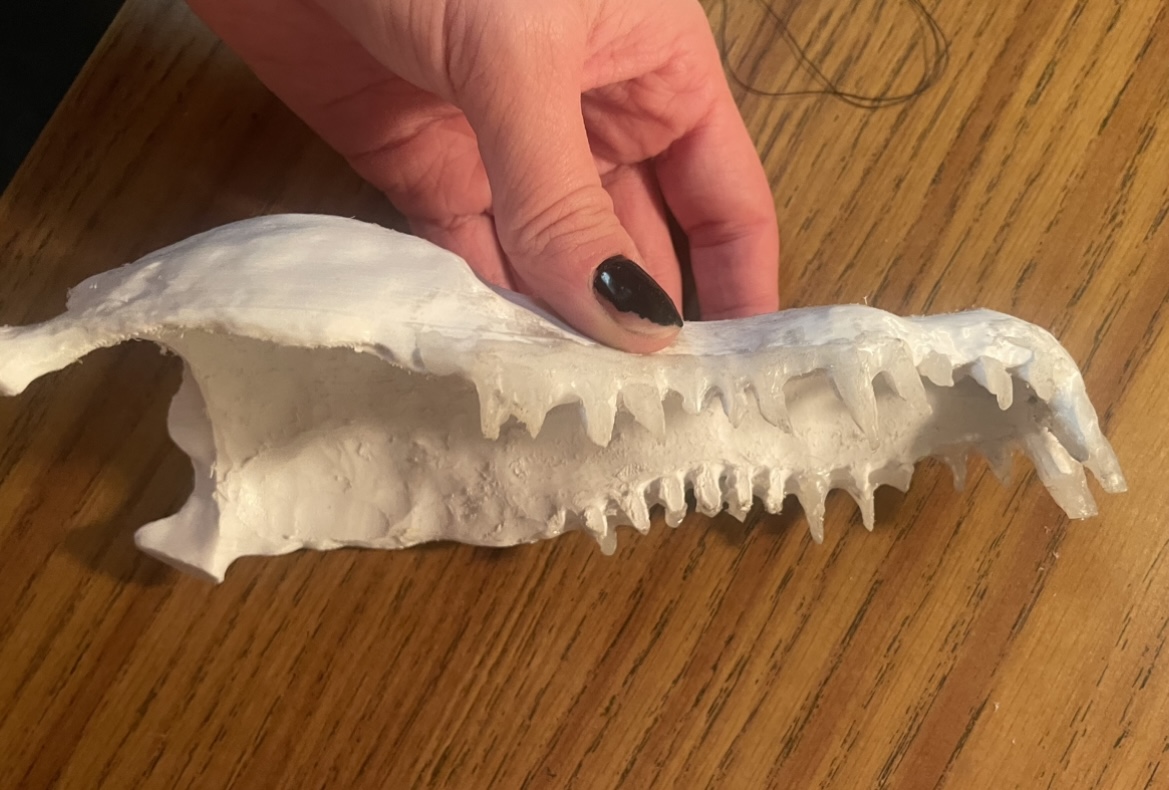
Once casted, the parts are left with an outer cast finish and are still far from being a final product. After cutting off my gate & runner and sprue with a hacksaw, I needed to tackle the sand breakage between the teeth to achieve the crocodile skull look I was going for. Since I had a ton of flash to work with on the inside, I experimented withh a variety of tools to remove material- files, jewelers saws, dremels, grinding wheels, orbital sanders, and more. In time, I found the best method for removing large amounts of breakage was the angle grinder, and the dremel for refining small parts of the teeth.
As for finishing, I used the grinding wheel to smooth out the outer face of the skull and rid of the majority of the cast finish before I began sanding. I decided to leave the cast finish on the inside so the piece would feel more organic, and add contrast to the skull. Since I knew the brazing would affect the finish, I waited to attach my parts before moving any further.
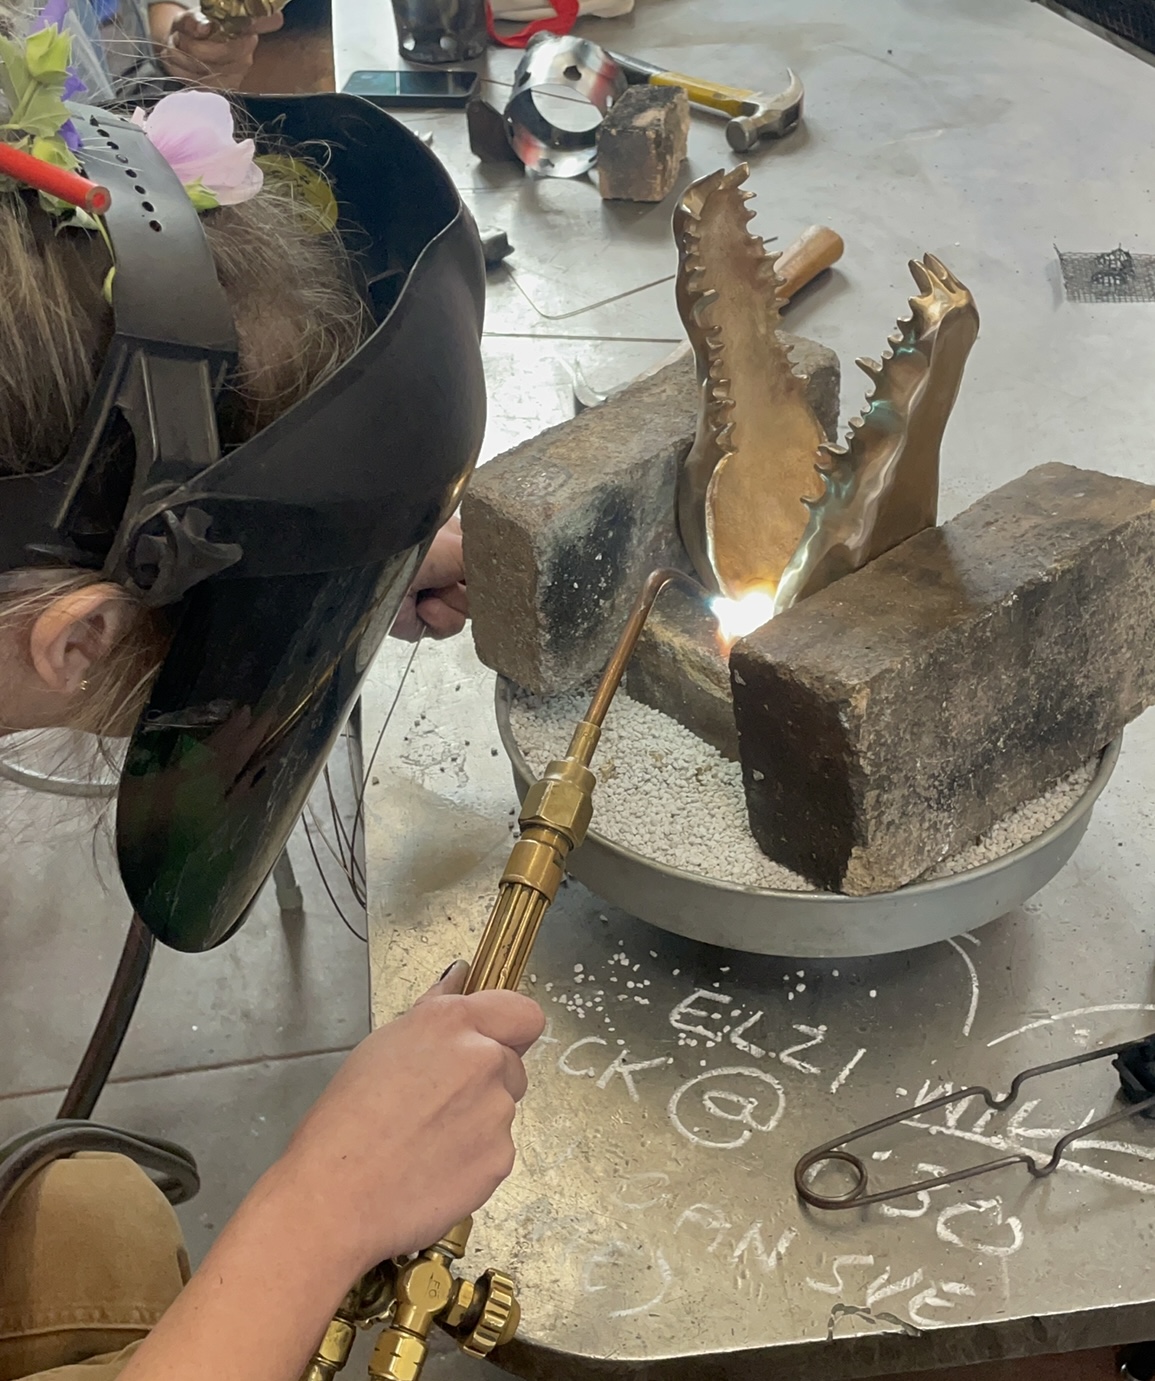
Brazing
To attach the upper and lower jaw of the crocodile head, I used oxy-aceteline brazing methods. After ensuring the parts were flush enough against one another, I positioned them, added flux paste, and prepared my torch. With the torch in my right hand and solder in the other, I concentrated the flame on the area until the flux bubbled and turned into the correct consistency. From the upper side of the crevice, I used my left hand to feed in the solder letting gravity and capillary action do the majority of the work before repeating on the other side. After cooling, my piece was secured together extremely well and ready to be finished. Before continuing the finishing process, I pickled the head to remove the braze finish and sanded off any excess solder for a smooth joint. Since my part was already at a 400 grit, I sanded the part from 600-5000 while alternating directions. Finally, using compound and the polishing wheel, I polished the entire skull and cleaned off any excess compound to achieve a perfect mirror finish.
Once casted, the parts are left with an outer cast finish and are still far from being a final product. After cutting off my gate & runner and sprue with a hacksaw, I needed to tackle the sand breakage between the teeth to achieve the crocodile skull look I was going for. Since I had a ton of flash to work with on the inside, I experimented withh a variety of tools to remove material- files, jewelers saws, dremels, grinding wheels, orbital sanders, and more. In time, I found the best method for removing large amounts of breakage was the angle grinder, and the dremel for refining small parts of the teeth.
As for finishing, I used the grinding wheel to smooth out the outer face of the skull and rid of the majority of the cast finish before I began sanding. I decided to leave the cast finish on the inside so the piece would feel more organic, and add contrast to the skull. Since I knew the brazing would affect the finish, I waited to attach my parts before moving any further.
Brazing
To attach the upper and lower jaw of the crocodile head, I used oxy-aceteline brazing methods. After ensuring the parts were flush enough against one another, I positioned them, added flux paste, and prepared my torch. With the torch in my right hand and solder in the other, I concentrated the flame on the area until the flux bubbled and turned into the correct consistency. From the upper side of the crevice, I used my left hand to feed in the solder letting gravity and capillary action do the majority of the work before repeating on the other side. After cooling, my piece was secured together extremely well and ready to be finished. Before continuing the finishing process, I pickled the head to remove the braze finish and sanded off any excess solder for a smooth joint. Since my part was already at a 400 grit, I sanded the part from 600-5000 while alternating directions. Finally, using compound and the polishing wheel, I polished the entire skull and cleaned off any excess compound to achieve a perfect mirror finish.
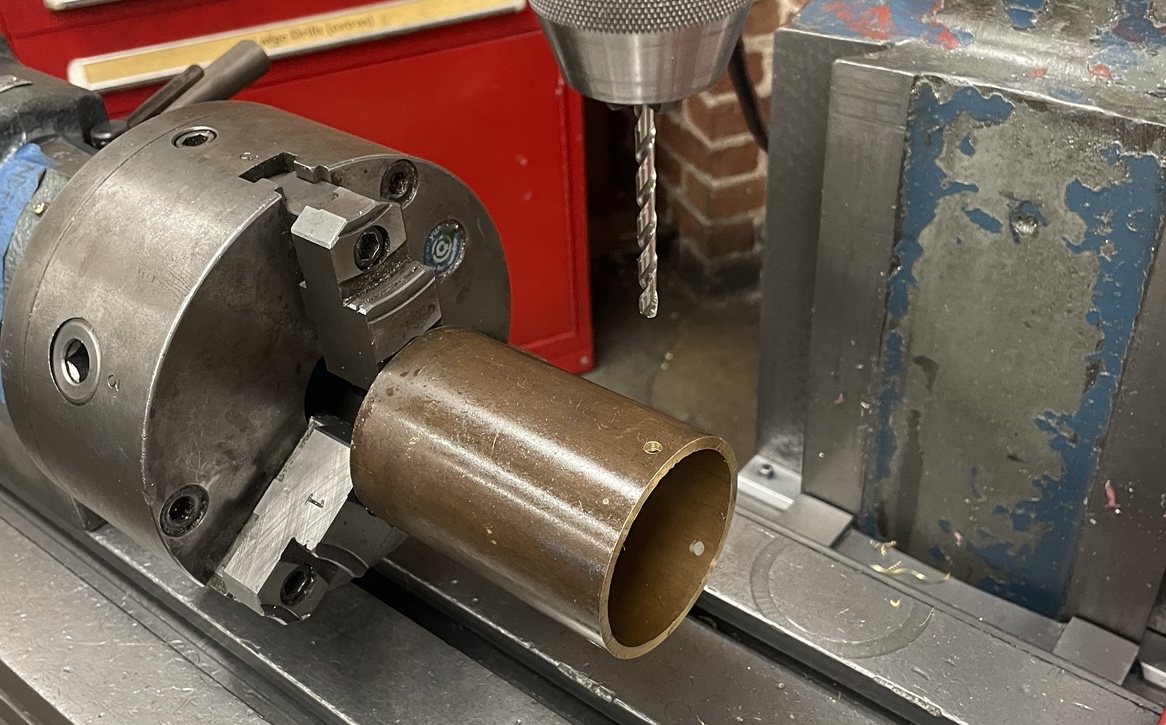
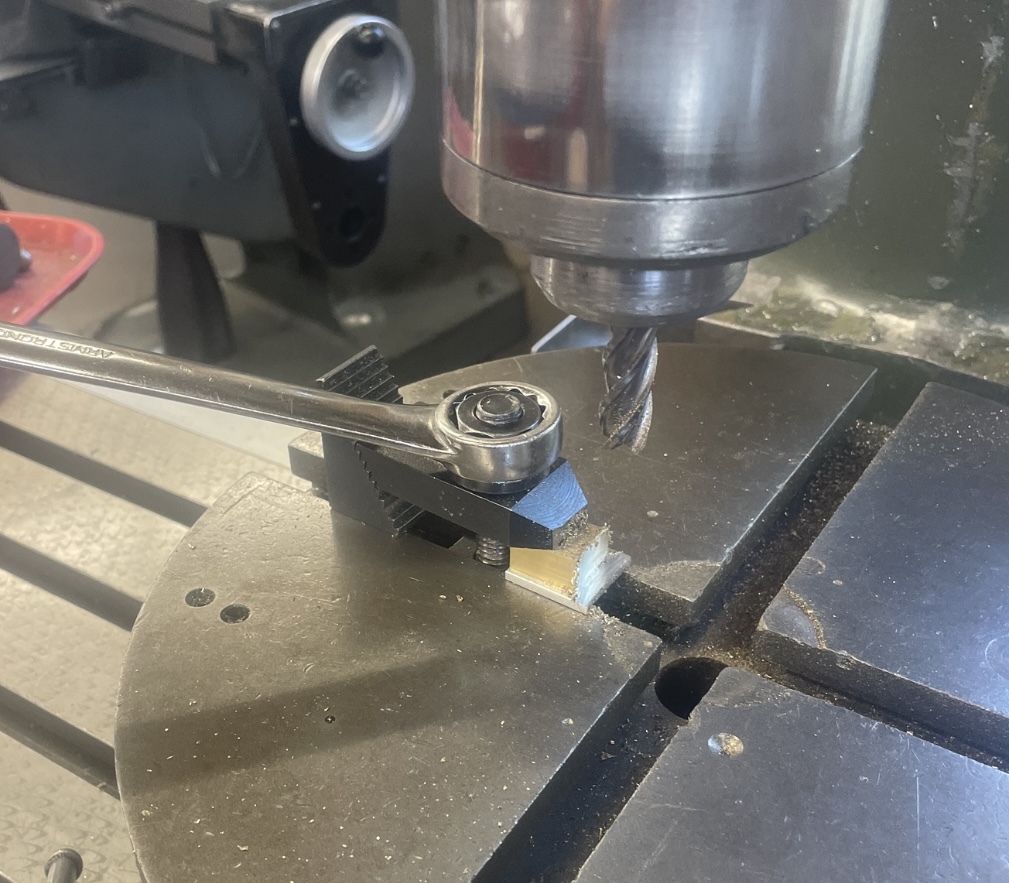
Milling
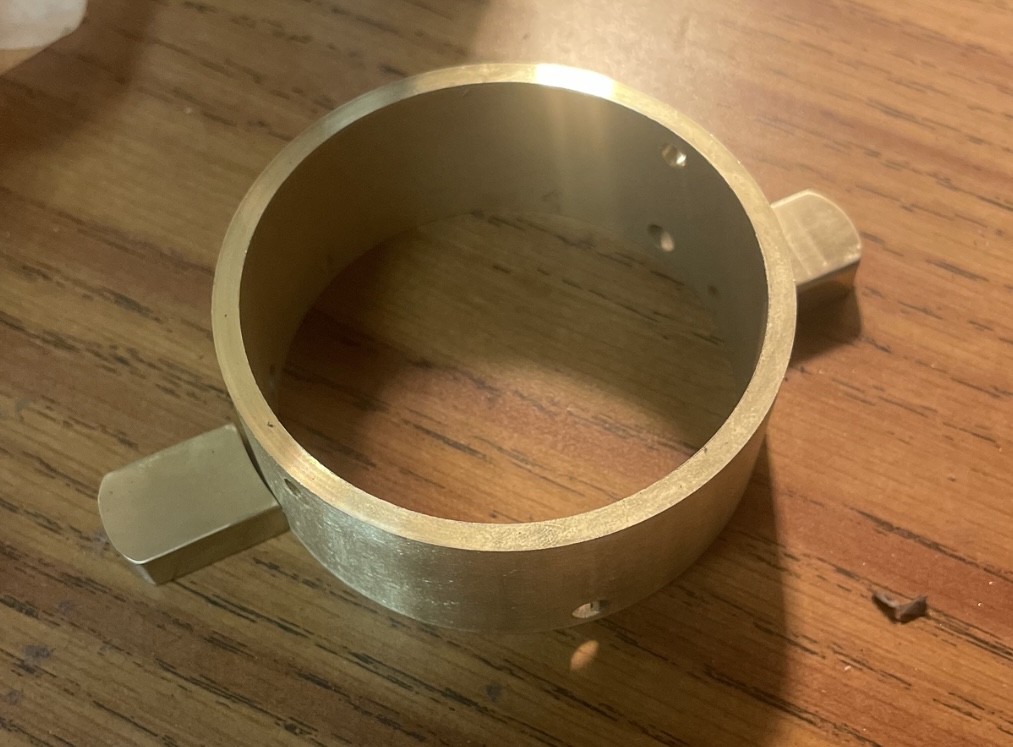
For my base, I decided to create an optional hanger for the crocodile head consisting of a tube which would hang from chains, and two symmetrical pins attached to said tube for the crocodile head to rest on. The first step to creating my base was drilling three equilateral holes into the tube, which would fit inside the base of the skull and connect to three chains for hanging. Since I wanted the skull to either sit on a table or hang from above, I chose not to press fit the tube inside skull, but rather create two pins from which the joints could rest on for easy deconstruction. First, I used a piece of scrap brass stock to create two small, identical rectangles which I could adjust for my purposes. For the pins to sit flush against the tube, I used the rotary table and a 1/4” endmill to cut out the exact radius on the inside of the pins. Next, I center drilled and tapped holes on both pins so I could fasten them to the tube with screws from the inside. Finally, after cutting the tube to size using the horizontal bandsaw, I once again added two equilateral holes to the tube again using the indexing head to prepare the pieces for assembly.
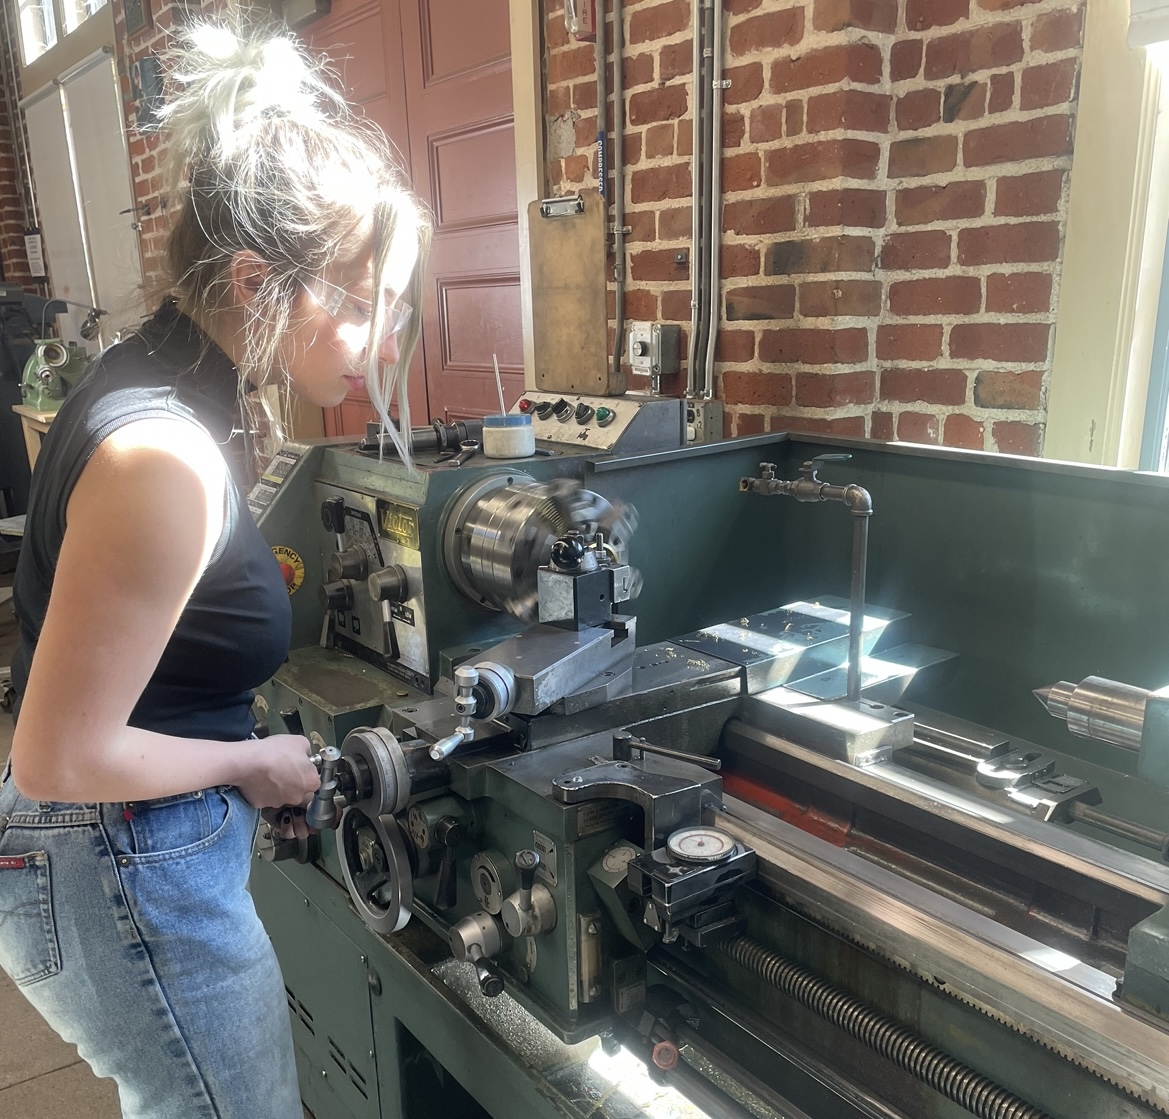
Turning
To really make my base shine, I decided to do the finishing on the lathe. Using the right hand tool, I faced off both ends as well as the outside of the tube. I then used 600-5000 grit to bring the tube to a smooth finish before polishing & final assembly.
For my base, I decided to create an optional hanger for the crocodile head consisting of a tube which would hang from chains, and two symmetrical pins attached to said tube for the crocodile head to rest on. The first step to creating my base was drilling three equilateral holes into the tube, which would fit inside the base of the skull and connect to three chains for hanging. Since I wanted the skull to either sit on a table or hang from above, I chose not to press fit the tube inside skull, but rather create two pins from which the joints could rest on for easy deconstruction. First, I used a piece of scrap brass stock to create two small, identical rectangles which I could adjust for my purposes. For the pins to sit flush against the tube, I used the rotary table and a 1/4” endmill to cut out the exact radius on the inside of the pins. Next, I center drilled and tapped holes on both pins so I could fasten them to the tube with screws from the inside. Finally, after cutting the tube to size using the horizontal bandsaw, I once again added two equilateral holes to the tube again using the indexing head to prepare the pieces for assembly.
Turning
To really make my base shine, I decided to do the finishing on the lathe. Using the right hand tool, I faced off both ends as well as the outside of the tube. I then used 600-5000 grit to bring the tube to a smooth finish before polishing & final assembly.
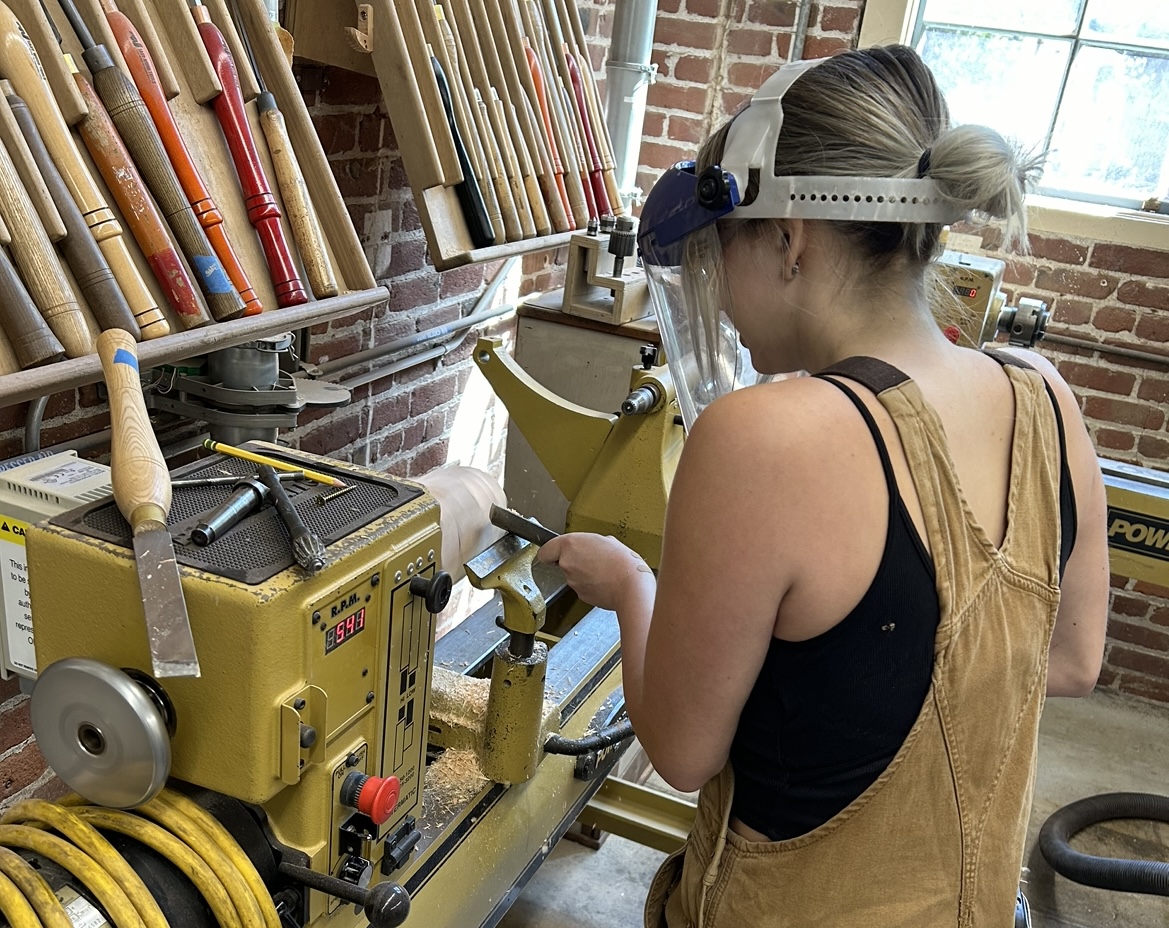
Wood Turning
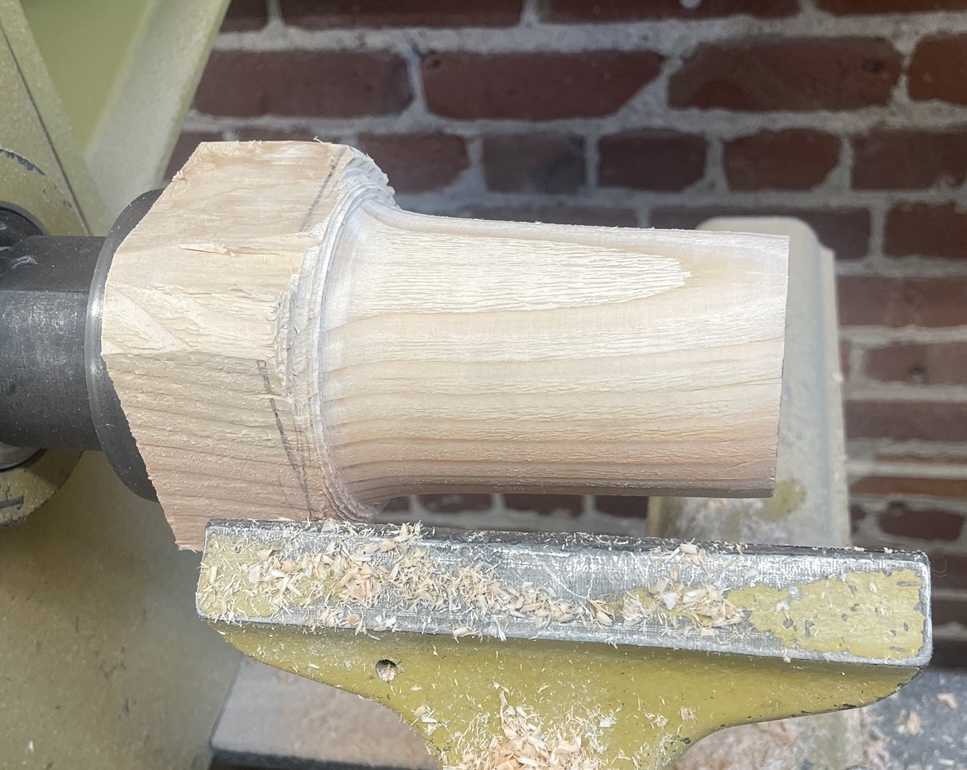
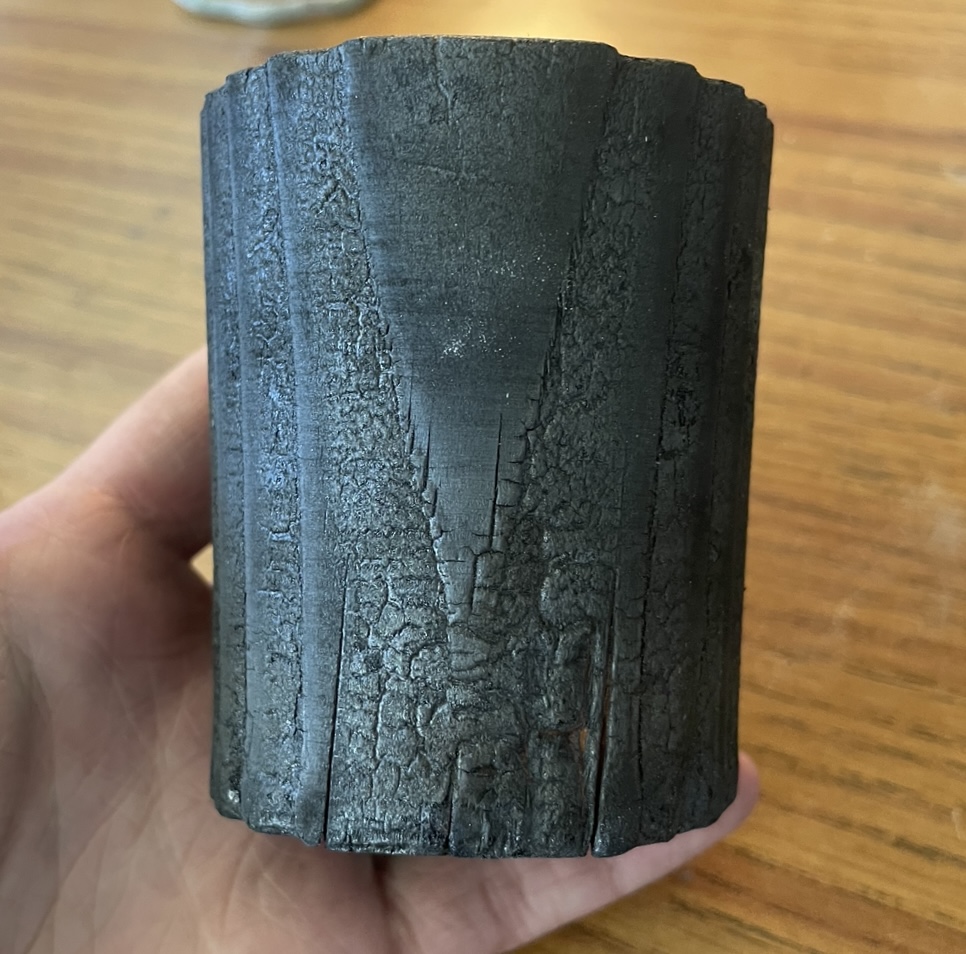
To top it off, I decided to create a pot myself that would perfectly fit the dimensions of the hanger as well as the orchid. From a scrap of pine, I used the wood lathe to carve the outside to a smooth, slightly tapered shape. Next, I turned the inside of the pot so my plant could fit inside. Finally, using japanese wood burning techniques, I finished the pot to a dark black shade with a charred, almost crocodile skin like texture.
To top it off, I decided to create a pot myself that would perfectly fit the dimensions of the hanger as well as the orchid. From a scrap of pine, I used the wood lathe to carve the outside to a smooth, slightly tapered shape. Next, I turned the inside of the pot so my plant could fit inside. Finally, using japanese wood burning techniques, I finished the pot to a dark black shade with a charred, almost crocodile skin like texture.

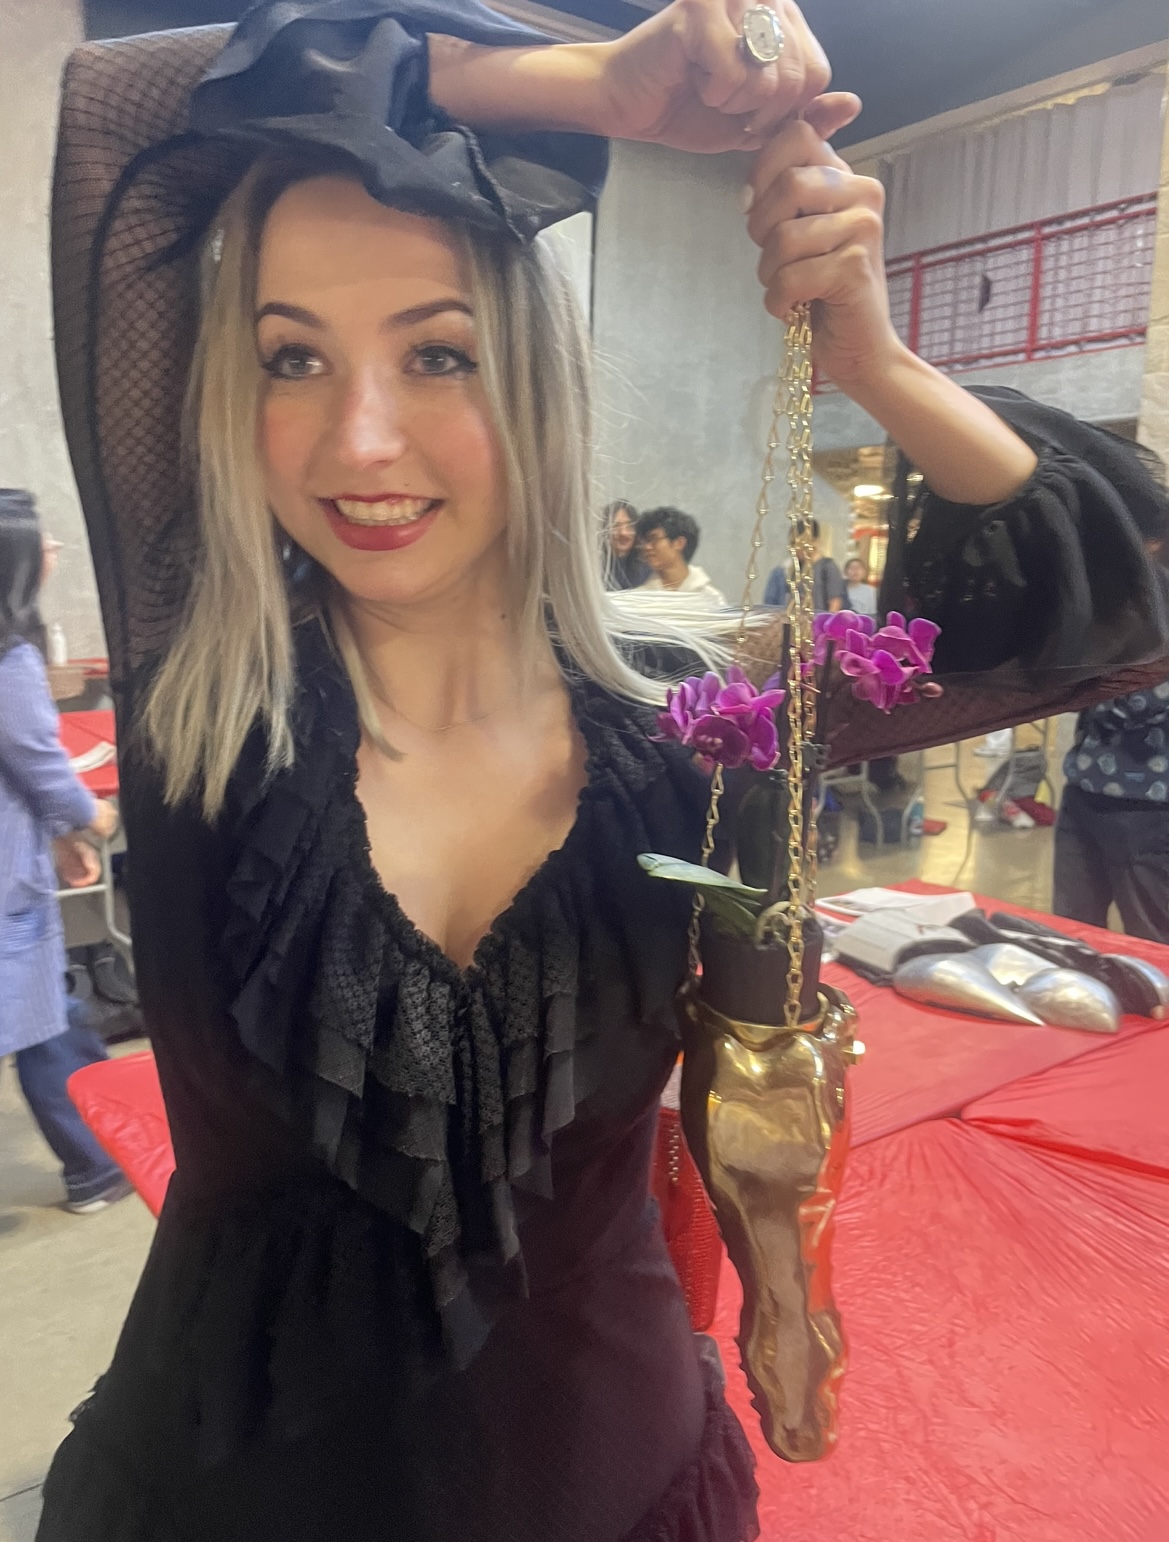
Presenting at Meet the Makers
Once I had all my components finished, I assembled them all to create the multipurpose planter you see here. And at the end of the quarter, I had the honor of presenting my work alongside other students at Stanford’s triannual Meet the Makers event. After working so hard on this project, it was great to finally see what others in the Product Realization Lab had been up to, as well as showcasing my own work for others to see. I learned alot from working on “Snaggletooth,” and am excited to see where my new skills take me in the future.
Once I had all my components finished, I assembled them all to create the multipurpose planter you see here. And at the end of the quarter, I had the honor of presenting my work alongside other students at Stanford’s triannual Meet the Makers event. After working so hard on this project, it was great to finally see what others in the Product Realization Lab had been up to, as well as showcasing my own work for others to see. I learned alot from working on “Snaggletooth,” and am excited to see where my new skills take me in the future.